How to Remove Ring Doorbell in 5 Easy Steps
Ring Doorbells have become an integral part of modern home security, allowing homeowners to monitor and communicate with visitors remotely. However, there are situations where you might need to remove a Ring Doorbell, whether for relocation, upgrading to a different model, or installing a new system. In this comprehensive guide, we will walk you through the process of how to remove Ring Doorbell in five easy steps, ensuring a smooth and safe procedure.
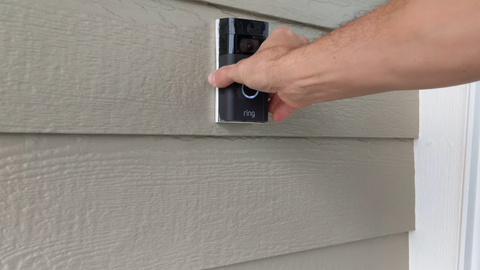
Types of Ring Doorbells
Ring Doorbells come in two main configurations: wired and wireless (battery-powered). The eight models within these categories include:
Wired Ring Doorbells:
-
Ring Doorbell Wired
-
Ring Doorbell Pro
-
Ring Doorbell Pro 2
-
Ring Doorbell Elite
Battery-Powered Ring Doorbells:
-
Ring Doorbell (2nd Generation)
-
Ring Doorbell 3
-
Ring Doorbell 3 Plus
-
Ring Doorbell 4
Understanding the type of Ring Doorbell you have is essential as the removal process may vary slightly based on the model.
Preparing to Remove the Ring Doorbell
Before starting the removal process, it's crucial to gather the necessary tools and supplies, prioritize safety precautions, and plan out your work area.
Gather Tools & Supplies
Ensure you have the following tools and supplies ready:
-
Screwdriver with Phillips and Torx bits
-
Micro USB cable (if applicable)
-
Labeling materials (for wires)
-
Safety gloves
Safety Precautions
Exercise caution to avoid injuries or damage to the doorbell. Turn off power to the Ring Doorbell to ensure safety during the removal process.
Plan Out Your Work Area
Choose a well-lit workspace with easy access to the Ring Video Doorbell. Ensure proper lighting and consider the height and accessibility of the installation site.
How to Remove Ring Doorbell: Step-by-Step Guide
Understanding how to remove Ring Doorbell allows you to make changes to your security system without relying on professional help, saving time and money. Additionally, knowing the removal process ensures that the Ring device is handled correctly, minimizing the risk of damage and ensuring a successful reinstallation if needed.
Step 1. Disconnect the Power
Turn off the power source connected to the Ring Doorbell. For hardwired doorbells, locate and turn off the corresponding doorbell breaker in the electrical panel. For battery-powered models, ensure the battery is removed or disconnected. If your doorbell is connected to a constant power supply, unplug it.
Step 2. Remove the Faceplate
The Ring Doorbell faceplate cover protects its internal components, such as the battery and wiring, from external elements. Additionally, it serves an aesthetic purpose by concealing the screws that secure the doorbell to the wall, enhancing its visual appeal. The process of removing the faceplate cover may slightly vary depending on the model that you have. Notably, the Elite models do not have a faceplate.
If you have a battery-powered Ring Doorbell (2-4), Ring Doorbell (2nd Generation), Pro, or Pro 2, the faceplate covers the bottom three-fourths of the doorbell and is attached using a star-shaped "security screw" at the very bottom of the unit.
Steps to Remove Ring Doorbell Cover (Wireless)
-
Use the provided Ring screwdriver with a two-sided bit – one side has an X-shaped Phillips head bit attached and the other has a star-shaped Torx bit.
-
Locate the security screw at the very bottom of the base plate. Using the screwdriver, unscrew it. If you no longer have the provided screwdriver, you can use a T6 Torx bit on an alternative screwdriver or power drill.

-
Gently pull the bottom of the faceplate upward and outward at a 45-degree angle.

Steps to Remove Ring Doorbell Cover (Wired)
The removable faceplate on wired and Elite units wraps around the outer edges of the doorbell rather than covering the entire front surface. Unlike models with a security screw, the faceplate is secured using plastic tabs that click in and out of place.
-
Grab both sides of the doorbell firmly to keep control and stability while removing it.
-
Apply gentle pressure in the middle of the faceplate to detach it from the base. Be careful not to use too much force. The plastic tabs should click in and out easily.
3. Detach the Doorbell From the Wall
The Ring doorbell Wired, Pro, Pro 2, and battery-powered models 2-4 are directly attached to the wall using four Phillips-head screws—two on each side. To detach the doorbell, use the Phillips head bit on the provided screwdriver or your own screwdriver or power drill to unscrew the entire doorbell.

For models with a mounting bracket:
The Ring doorbell (2nd Generation) and Elite models use a rectangular wall mount bracket anchored to the wall using four Phillips-head screws on each corner. To detach the doorbell, gently pull upward and outward at a 45-degree angle.

Other doorbells may be attached to third-party mounts, such as the Wasserstein Adjustable Mount & Wall Plate or the Wasserstein Solar Charger. Refer to the manufacturers' guide on how to remove them.
4. Uninstall the Doorbell Wiring
For Wired Ring doorbells, there will be two electrical wires connected to them. If the doorbell is attached to a wall mounting bracket, the wires will be attached to the bracket. For doorbells directly attached to the wall, the wires will be connected to the back of the unit.

Either way, one end of the wire will be attached to a single Phillips-head screw known as a "terminal screw." For wall mounting brackets, the Phillips head of the terminal screw is positioned on the front, facing you. In all other models, it is located on the back. Use a Phillips-head screwdriver to gently loosen each screw and pull the wires out.
5. Remove the Mount
If the mounting bracket screws have not been removed yet, you can proceed to remove them at this stage.

How to Remove Ring Doorbell Without Tools
If you used an alternative installation process such as a permanent outdoor mounting tape, follow these steps to safely remove the doorbell:
-
Carefully examine the device fastened to the wall to determine the best way to safely remove it.
-
When removing the entire Ring Doorbell, avoid grabbing it with your hand and pulling, as this could risk breaking the casing and damaging the wall.
-
Get a lever with a dull edge. Slowly and carefully use it to pull the device off the wall towards yourself.
-
Be careful not to damage the wall or the Ring Doorbell during the process.
Troubleshooting
In the event you encounter issues during the removal process, consider the following troubleshooting steps:
-
Check Connections: Ensure all connections are properly disconnected and wires are free from any entanglements.
-
Inspect for Damage: Examine the Ring Doorbell and its components for any signs of damage or wear that may have occurred during the removal.
-
Verify Power Off: Double-check that the power source has been completely turned off to avoid any electrical hazards.
-
Reinstall Components: If reinstallation is planned, ensure that all components are in good condition before proceeding.
Post-Removal Steps
Once the Ring Doorbell has been successfully removed, consider the following post-removal steps:
-
Secure Storage: If reinstallation is not immediate, store the removed Ring Doorbell in a secure and dry location to prevent damage.
-
Disposal Options: If the device is not intended for future use, research proper disposal methods or electronic waste recycling facilities in your area.
-
Patch Wall Holes: If any holes or marks were left on the wall after removal, consider patching or repairing them to restore the wall's appearance.
How to Remove Doorbell From Your Ring Account
To remove a doorbell from your Ring account, follow these simple steps:
-
Open the Ring App: Launch the Ring app on your smartphone or device.
-
Access the Menu: Tap on the menu icon (≡) located at the top left corner of the screen.
-
Navigate to Devices: Tap on the "Devices" option from the menu.
-
Select the Specific Device: Choose the specific doorbell device that you wish to release from your Ring account.
-
Go to Device Settings: Within the device interface, tap on "Device Settings."
-
Access General Settings: Tap on "General Settings" from the available options.
-
Remove the Device: Scroll down and tap on "Remove this Device," located at the bottom of the screen.


Leave a comment